Tag Archives: Visual Studio Code

Local Visual Studio Code to work on remote ERPNext Virtual Machine

At the last ERPNext User conference, Joel showed my a cool thing for developing ERPNext. We can run Visual Studio Code on the local machine and connect with it to the (remote) ERPNext development machine or virtual machine through SSH. So what do I need to get it working?

SSH connection to the virtual machine

Our ERPNext virtual machine (VM) is a Debian system running on VirtualBox. So I check that the SSH server is installed and running:

sudo service --status-all 

This lists all services running on the machine and ssh is already running. That’s good.

Next, I need to ensure, that I can access the VM. I check the NAT settings in VirtualBox – there is already one for ssh on port 22. I create a second NAT on port 2222 to enable freeing up port 22, just in case.
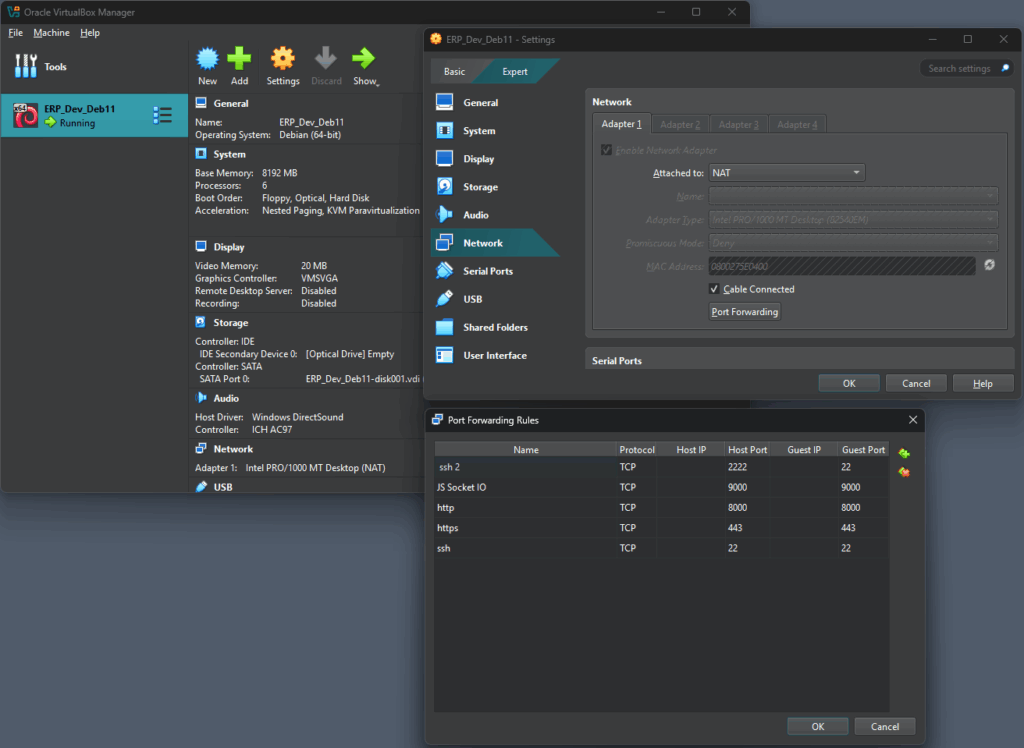
Last but not least, I check the connection with PuTTY. That works on port 22 and as well as on port 2222.

Remote – SSH on Visual Studio Code

In the Visual Studio Extensions section, I look for the Remote – SSH extension and install it. Futher down the line, two other extensions were installed: Remote – SSH: Editing Configuration Files and Remote Explorer.
Then, I follow this tutorial: https://code.visualstudio.com/docs/remote/ssh-tutorial

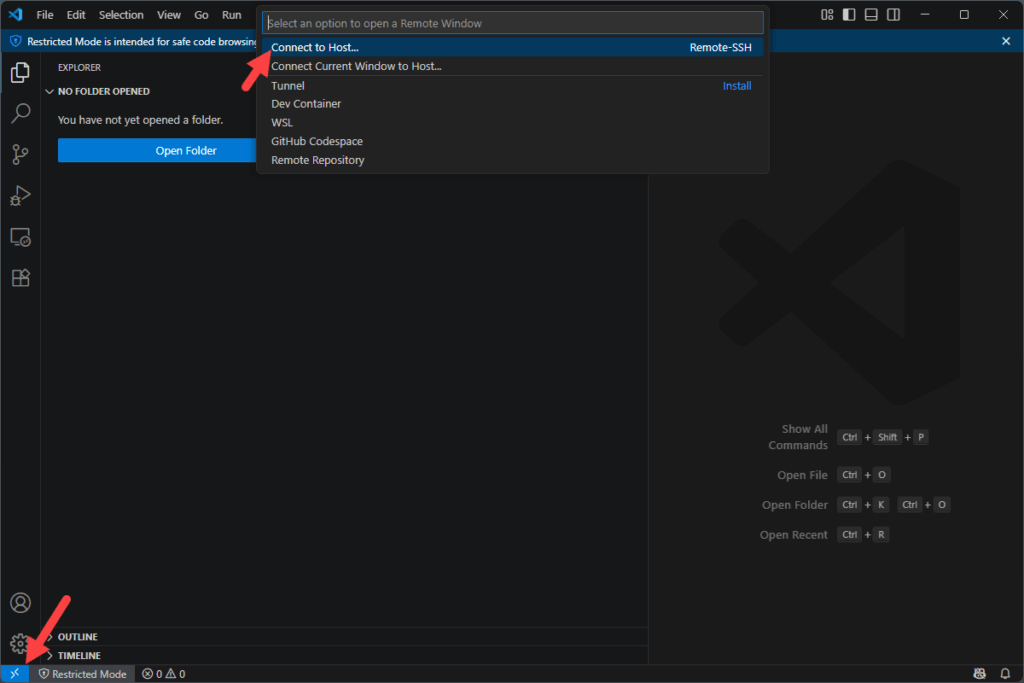
  • Click on the remote icon in the bottom status bar
  • Choose the Connect to Host… option
  • The select the + Add New SSH Host… option
  • Enter the connection command ssh libracore@localhost:2222
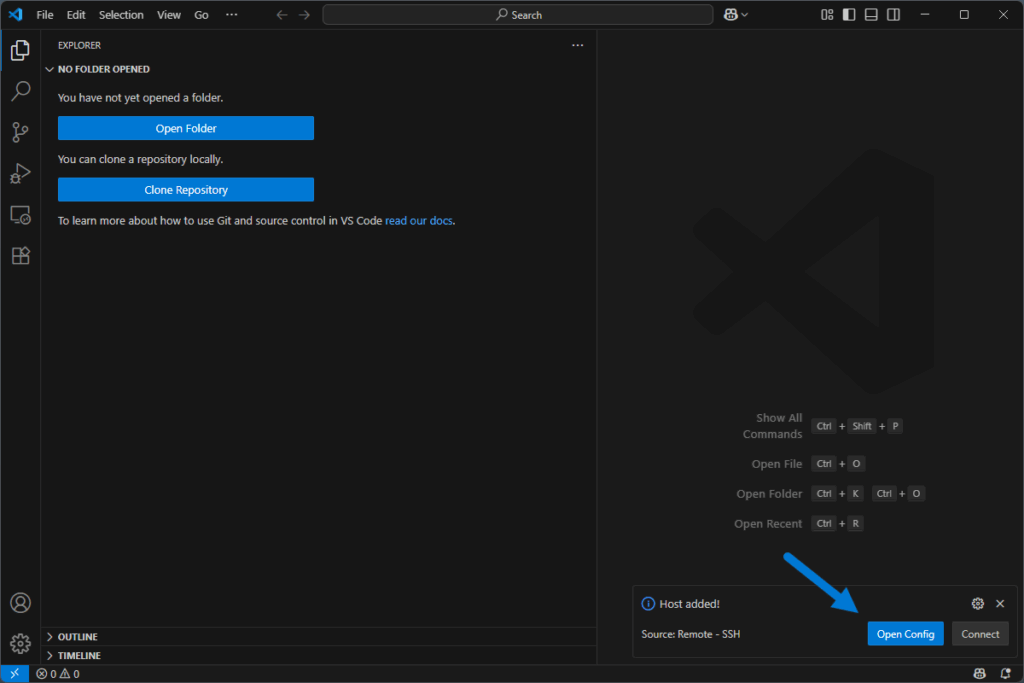
  • I select the config file in the .ssh folder of my home directory as configuration file to persist the settings:
    • Side note: Why does my hosting / my blog-system prevent me from using paths ans commands? Very anyoing.
  • I also check the configuration file:
  • Update the host name to erp_dev_vm
  • Save the file with Ctrl + S

Connect with Visual Studio Code to the ERP development machine

Now it’s time to connect to the ERP development machine. Follow the screenshots…

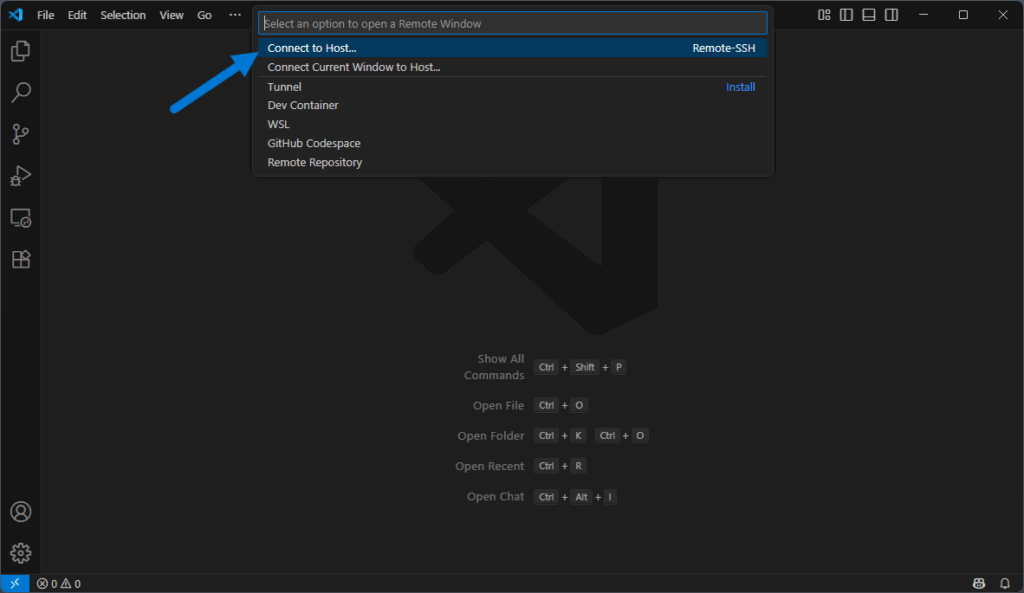
  • Click on the remote icon in the bottom status bar
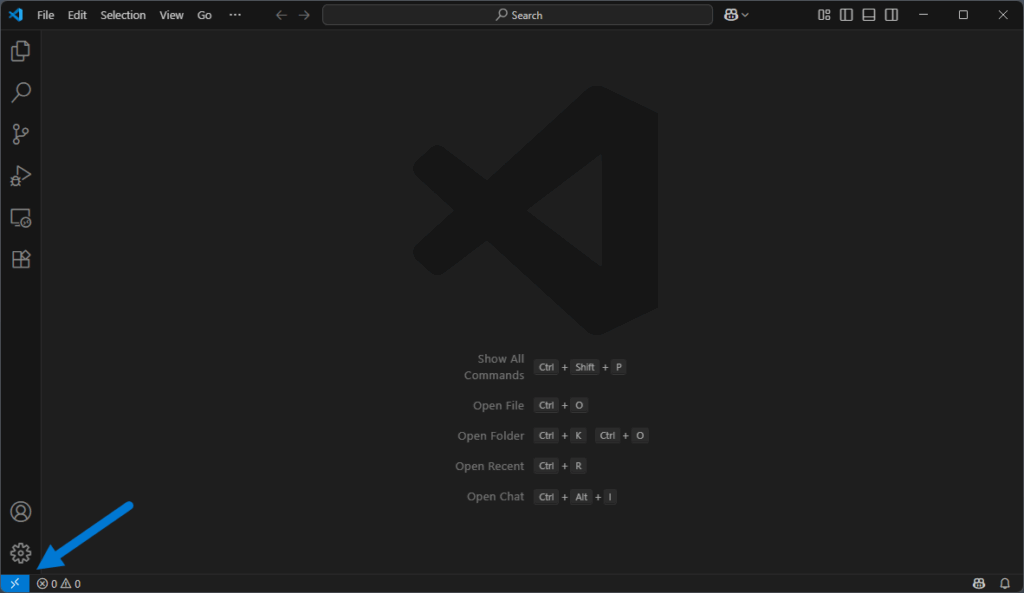
  • Choose the Connect to Host… option
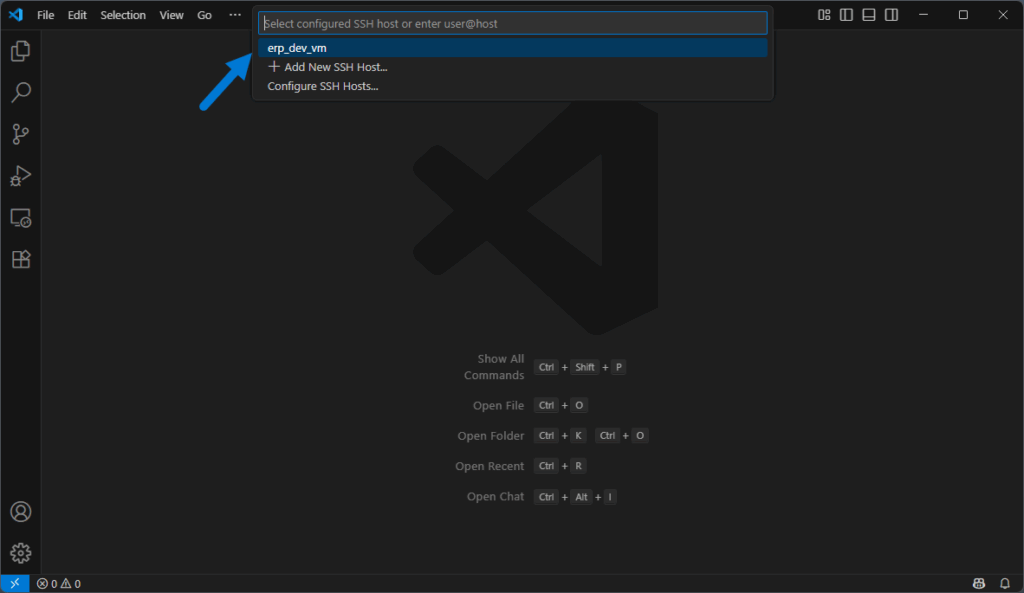
  • Select the erp_dev_vm
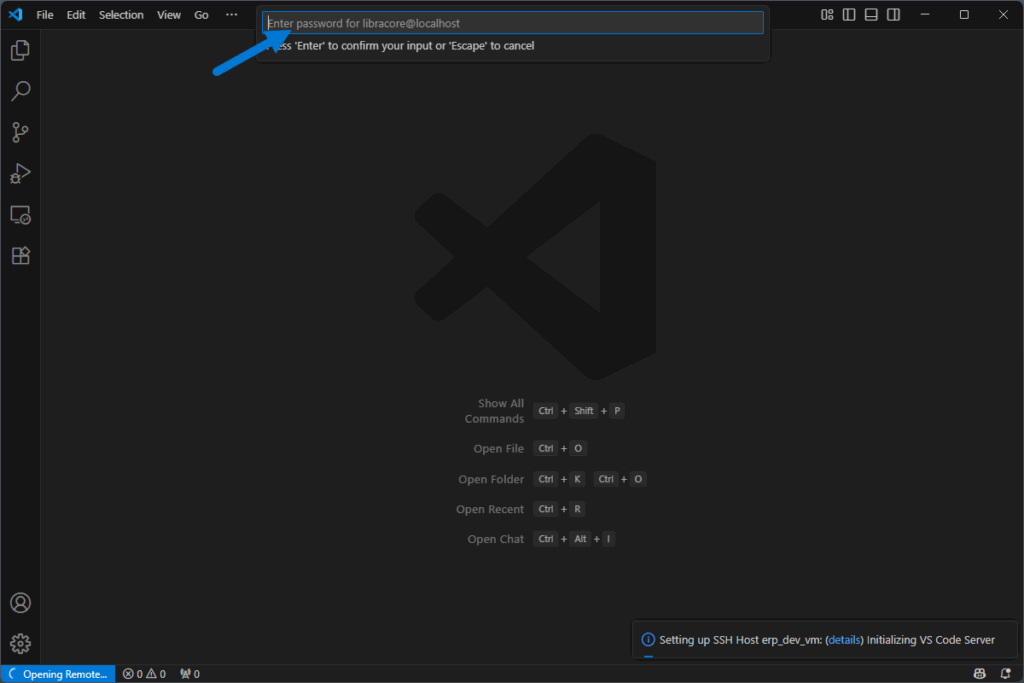
  • Enter the password for the user on the ERP development machine
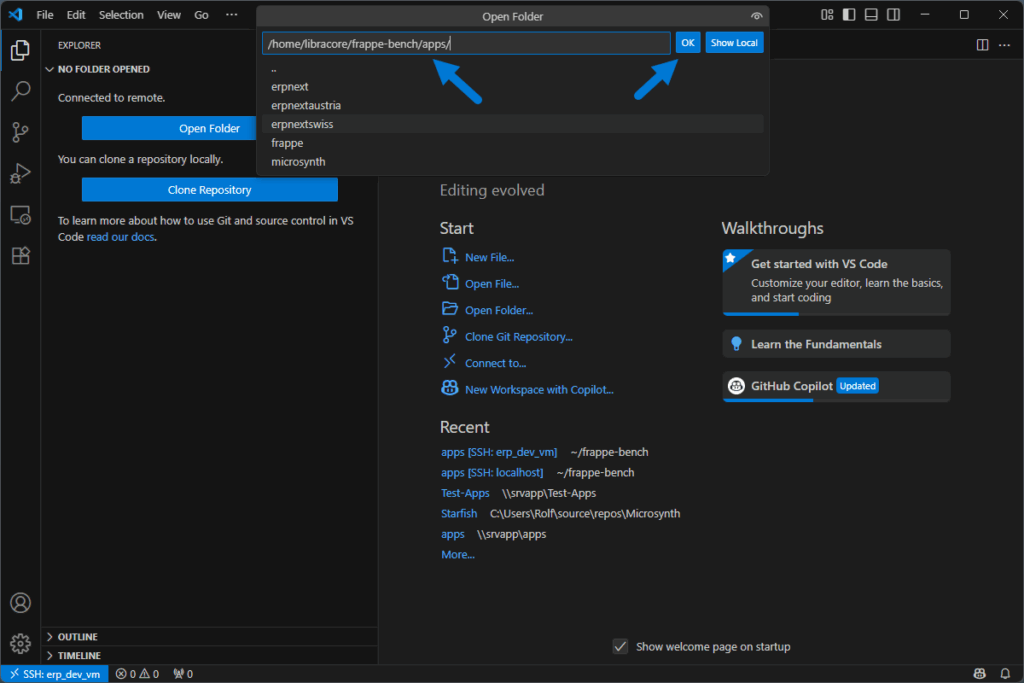
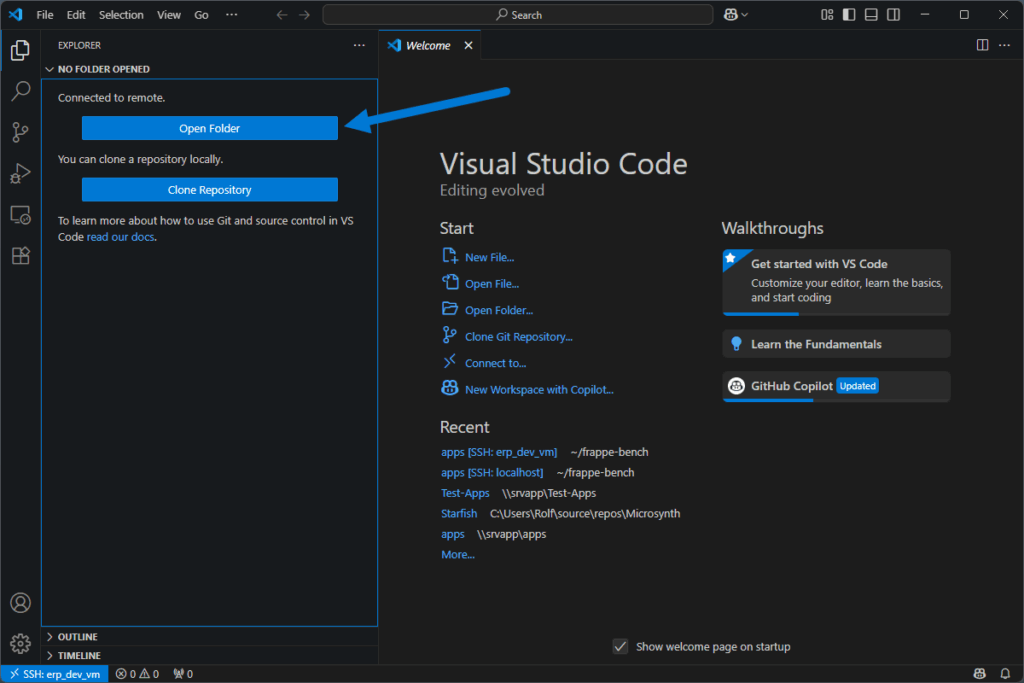
  • Set the path on the remote ERP development machine to open
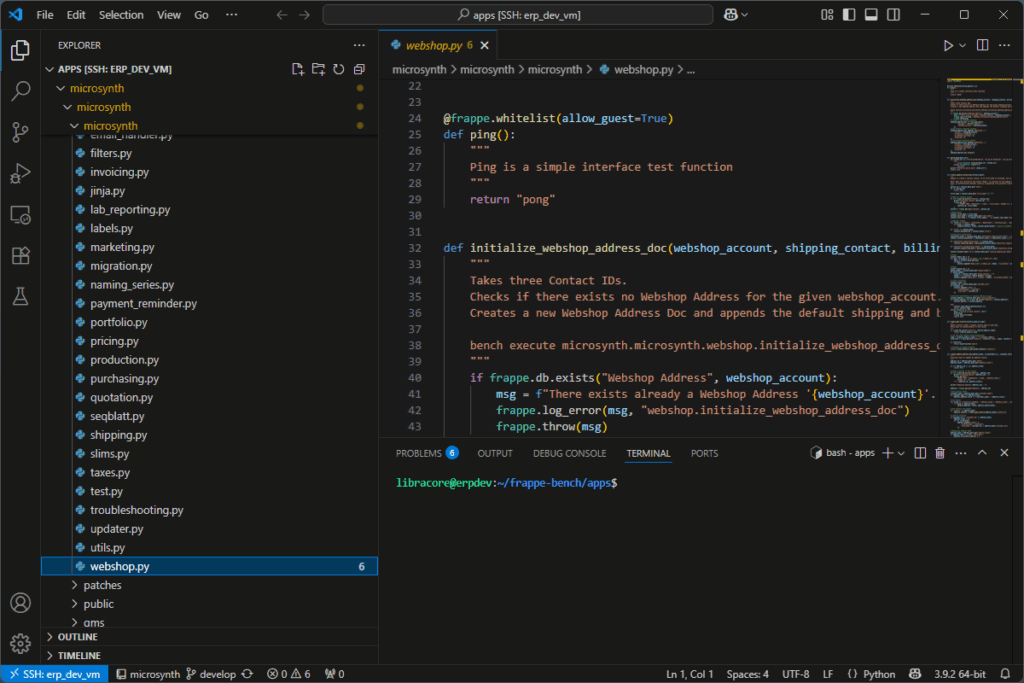
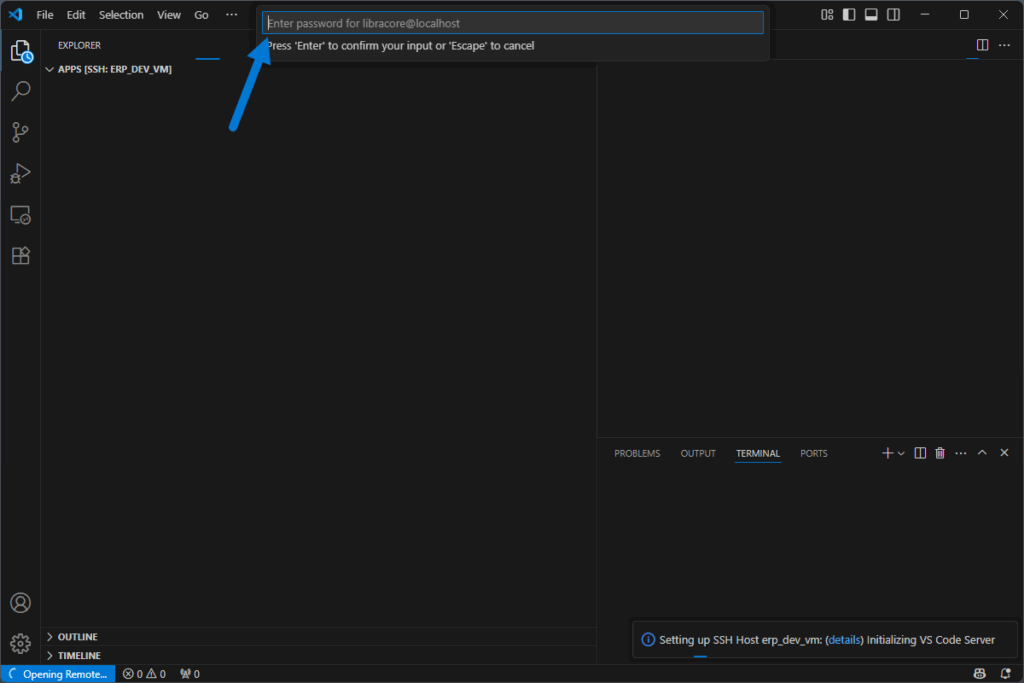
  • For some reason, Visual Studio Code has to open a new window and requires again the passwort. So, …
  • Enter the password for the user on the ERP development machine
Reconnect again with Visual Studio Code to the ERP development machine

If I close Visual Studio Code and open it again, it directly asks me for the password for the ERP development machine.

  • So, enter the password for the user on the ERP development machine again
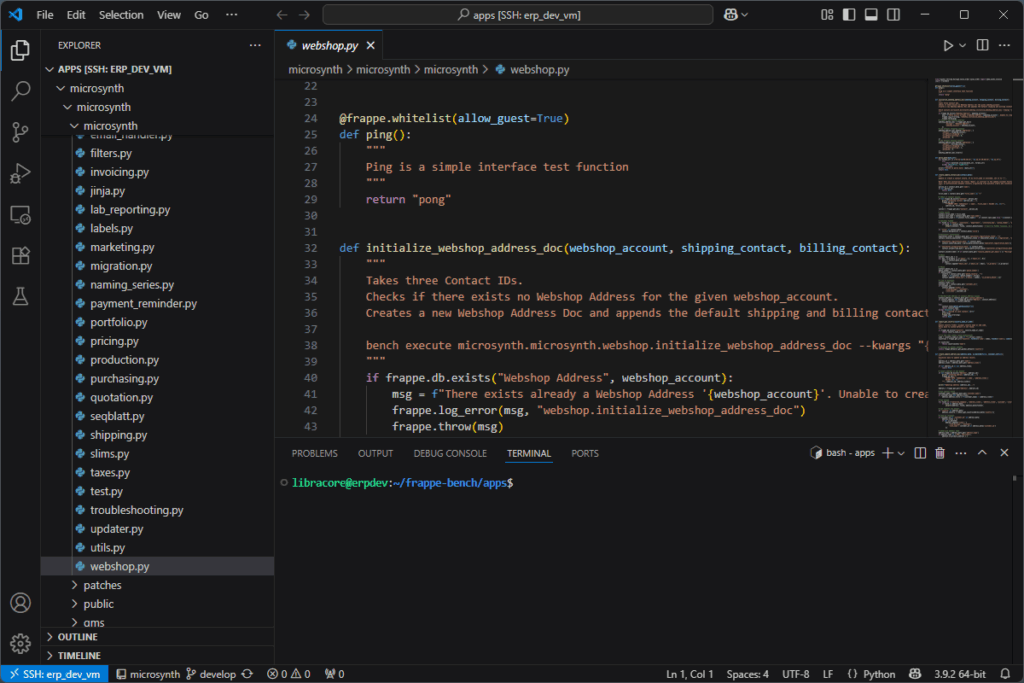
  • And now, I see my code again!

So that’s it for today. I am now able to connect to the ERP development machine with Visual Studio Code running on my local machine. 🥳
Links

Debug an F# .NET Core app in VS Code on macOS

Press ‘F5’

The F5 button is the magic button to start debugging. However, if you start debugging the first time, you need to set up VisualStudio Code first. You need to setup a launch.json file to start debugging and a tasks.json file to first run the process.

Setup

  • Press F5
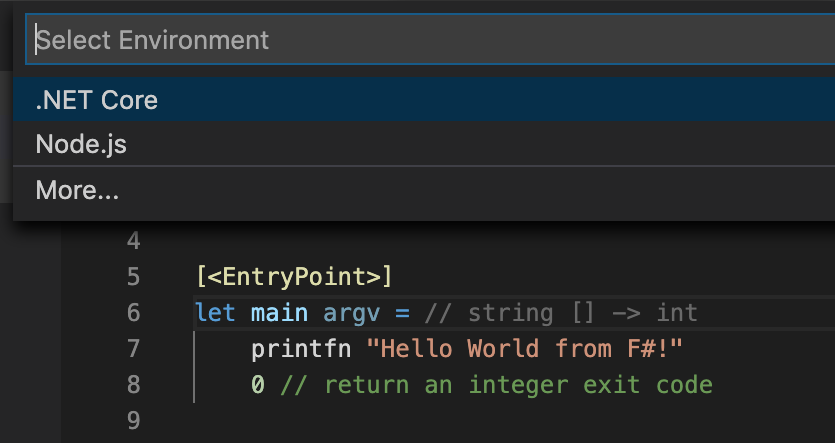
  • Select .NET Core
Initial setup for debugging: Press 'F5' and select '.NET Core'
Initial setup for debugging: Press ‘F5’ and select ‘.NET Core’
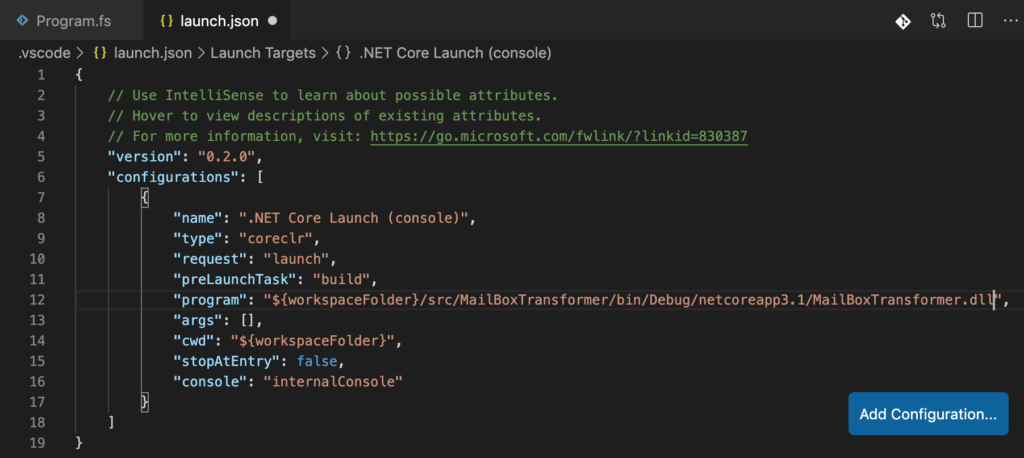
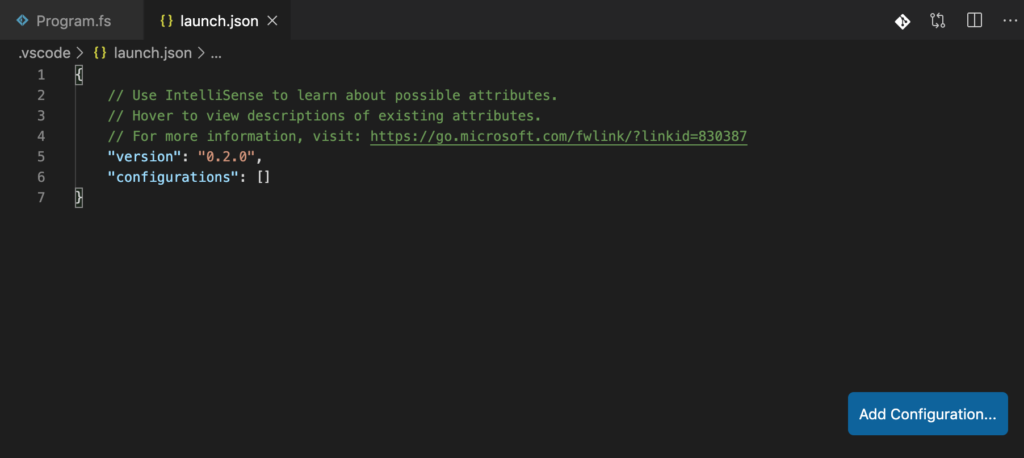
  • VS Code generates the launch.json file in the .vscode folder and opens it.
VS Code generates 'launch.json' in the '.vscode' folder
VS Code generates ‘launch.json’ in the ‘.vscode’ folder
  • Edit the launch.json file
  • Insert the configuration entry within the selected square brackets of the ‘configuration’ section
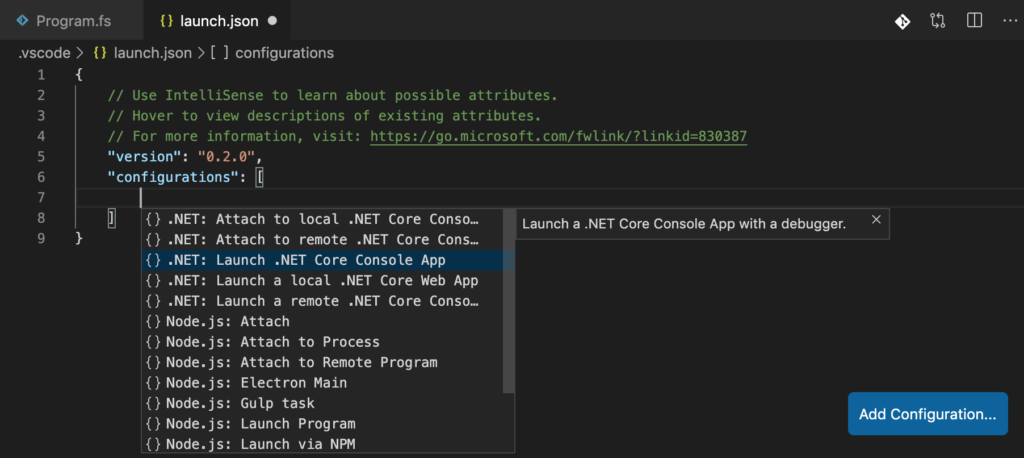
    • Press Ctrl + Space Bar
    • Select .NET: Launch .NET Core Console App
    • Enter the path to the application .dll file in the program attribute:
      "${workspaceFolder}/src/MailBoxTransformer/bin/Debug/netcoreapp3.1/MailBoxTransformer.dll"
    • The path differs from the original template because the project is within the src sub-folder.
Insert configuration entry by pressing 'Ctrl' + 'Space Bar' '.NET: Launch .NET Core Console App'
Insert configuration entry by pressing ‘Ctrl’ + ‘Space Bar’ ‘.NET: Launch .NET Core Console App’
Enter the path of the application '.dll' file in the 'program' attribute
Enter the path of the application ‘.dll’ file in the ‘program’ attribute
  • Press F5 again
  • VS Code now complains that it does not find the build task defined in the preLaunchTask attribute of the launch.json file
  • Select Configure Task
VS Code does not find the 'preLaunchTask' called 'build' and suggests to configure the task.
VS Code does not find the ‘preLaunchTask’ called ‘build’ and suggests to configure the task.
  • Select Create tasks.json file from template
Configure Task: Create 'tasks.json'
Configure Task: Create ‘tasks.json’
  • Choose the .NET Core Executes .NET core build command template
Select Task Template '.NET Core Executes .NET Core build command'
Select Task Template ‘.NET Core Executes .NET Core build command’
  • VS Code generates the tasks.json file in the .vscode folder and opens it.
  • Edit the tasks.json file
  • If the .fsproj file is not in the main folder
  • Insert the path of the directory containing the .fsproj file as an additional argument for dotnet build.
    • "${workspaceFolder}/src/MailBoxTransformer",
  • To see the logs of the build task in the console (optional):
    • Change the presentation attribute in the tasks.json file
      from "silent" to "always"
  • Press F5 again
  • VS Code runs
    • The dotnet build process
    • The app
  • Add the launch.json and the tasks.json files located in the .vscode folder to your source control system (e.g. git).
Console output of the app

You are now able to start the build process and the app itself from within VS Code. Now you can set break points and debug your app. I have included the complete launch.json and the tasks.json files below. Have fun!

launch.json

  • Located in the .vscode folder
{
    // Use IntelliSense to learn about possible attributes.
    // Hover to view descriptions of existing attributes.
    // For more information, visit: https://go.microsoft.com/fwlink/?linkid=830387
    "version": "0.2.0",
    "configurations": [
        {
            "name": ".NET Core Launch (console)",
            "type": "coreclr",
            "request": "launch",
            "preLaunchTask": "build",
            "program": "${workspaceFolder}/src/MailBoxTransformer/bin/Debug/netcoreapp3.1/MailBoxTransformer.dll",
            "args": [],
            "cwd": "${workspaceFolder}",
            "stopAtEntry": false,
            "console": "internalConsole"
        }
    ]
}

tasks.json

  • Located in the .vscode folder
{
    // See https://go.microsoft.com/fwlink/?LinkId=733558
    // for the documentation about the tasks.json format
    "version": "2.0.0",
    "tasks": [
        {
            "label": "build",
            "command": "dotnet",
            "type": "shell",
            "args": [
                "build",
                "${workspaceFolder}/src/MailBoxTransformer",
                // Ask dotnet build to generate full paths for file names.
                "/property:GenerateFullPaths=true",
                // Do not generate summary otherwise it leads to duplicate errors in Problems panel
                "/consoleloggerparameters:NoSummary"
            ],
            "group": "build",
            "presentation": {
                "reveal": "always"
            },
            "problemMatcher": "$msCompile"
        }
    ]
}

References

Create an F# .NET Core app on macOS

Create a console app with the CLI

dotnet new console -lang "F#" -o src/MyConsoleApp

Run the app in the terminal

The easy way: Move first to the folder with the .fsproj file and then use dotnet run without any arguments:

cd src/MyConsoleApp
dotnet run

If you want to start the app from a location different than the one containing the .fsproj file, you need to enter the argument --project with the path to the .fsproj file.

dotnet run --project src/MyConsoleApp/MyConsoleApp.fsproj 

References

Coding F# on macOS

Lately, I wanted to code some F# scripts. I started up Visual Studio Code on my MacBook and created an fsx file. Then I noticed that intellisense was not working anymore despite active code highlighting. That was the start for a long journey. I ended up on installing (again):

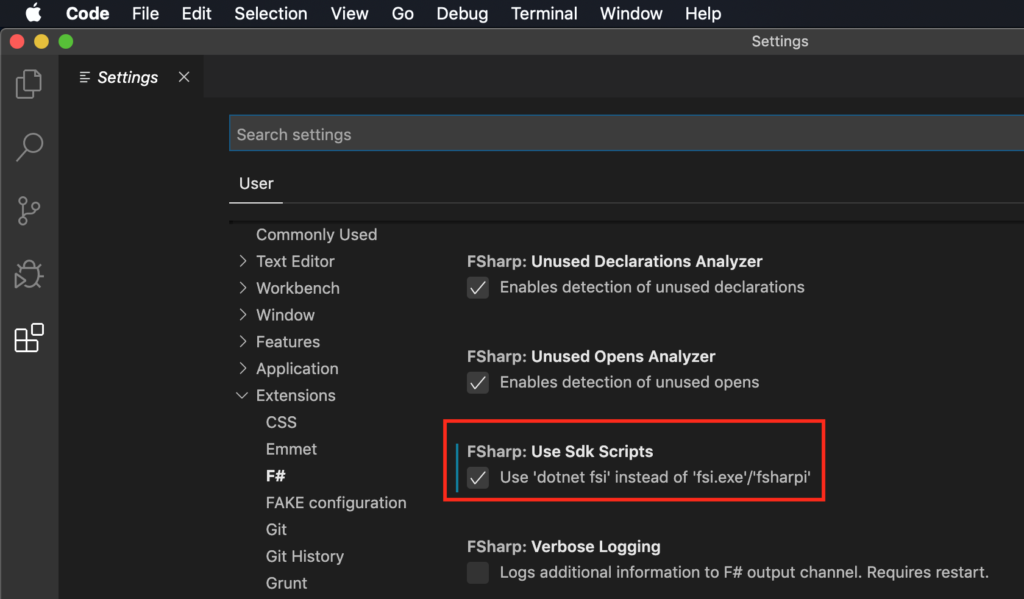
Intellisense was now working in F# projects and somehow/sometimes in fsx files within the context of an F# project. Then I tried it out in a stand-alone fsx file. Intellisense was not working again… Then I found some notes about the ‘FSharp.useSdkScripts’ option of the ionide-fsharp extension of Visual Studio Code. I activated the setting:

Visual Studio Code settings: Activate “Fsharp: Use Sdk Scripts: Use ‘dotnet fsi’ instead of ‘fsi.exe’/’fsharpi'”.

What a wonder, intellisense is working for F# fsx script files! With this setting enabled, I am no longer working with mono but with the .NET Core version of fsi (FSharp Interactive). With that, I think I don’t actually need mono.

References