For some obscure reason, Apple blocks me from accessing my own files with the Terminal. To allow Terminal to access all files and folders, I have to give Terminal the rights for “Full Disk Access” under “Security & Privacy
” in the “System Preferences
“.
Tag Archives: macOS
Transfer a Docker Image from Mac to Pi
TLDR
It didn’t work out. Don’t bother repeating it. It seems that with this way, the image is not of the correct architecture!
Aim
I’d like to transfer Docker images without depending on an external repository like Docker Hub.
Protocol
Check the images:
docker images
Save the image to a tar file:
docker save -o myImage.tar rolfsuter/testmultiarch:latest
Copy the tar file to the Pi:
scp myImage.tar pi@[IP]:myImage.tar
Connect to the Pi:
ssh pi@[IP]
List the current Docker images on the Pi:
sudo docker images
Load the image from the tar file:
sudo docker load -i myImage.tar
Check the image. Run:
sudo docker run --rm rolfsuter/testmultiarch:latest uname
Response:
standard_init_linux.go:211: exec user process caused "exec format error"
References
Debug an F# .NET Core app in VS Code on macOS
Press ‘F5’
The F5
button is the magic button to start debugging. However, if you start debugging the first time, you need to set up VisualStudio Code first. You need to setup a launch.json
file to start debugging and a tasks.json
file to first run the process.
Setup
- Press
F5
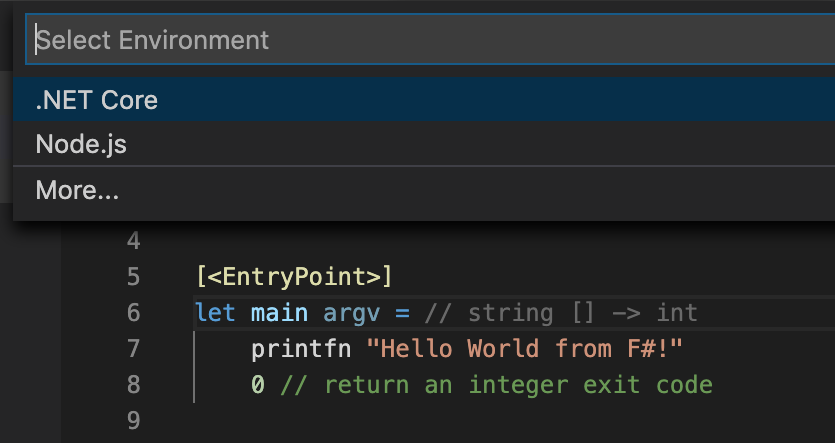
- Select
.NET Core
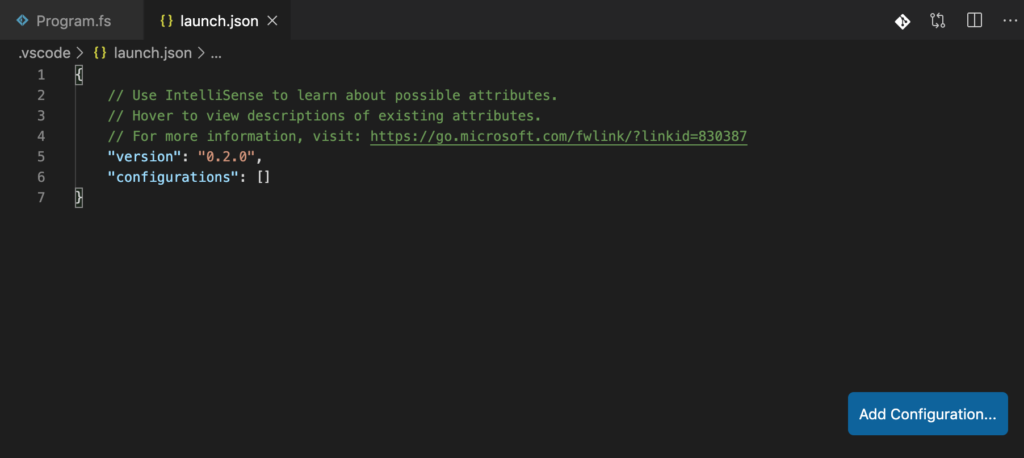
- VS Code generates the
launch.json
file in the.vscode
folder and opens it.
- Edit the
launch.json
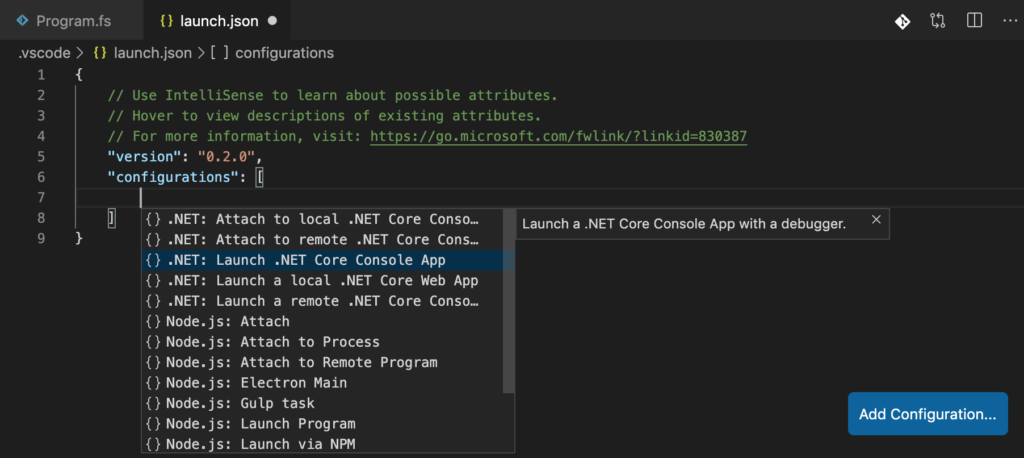
file - Insert the configuration entry within the selected square brackets of the ‘configuration’ section
- Press
Ctrl
+Space Bar
- Select
.NET: Launch .NET Core Console App
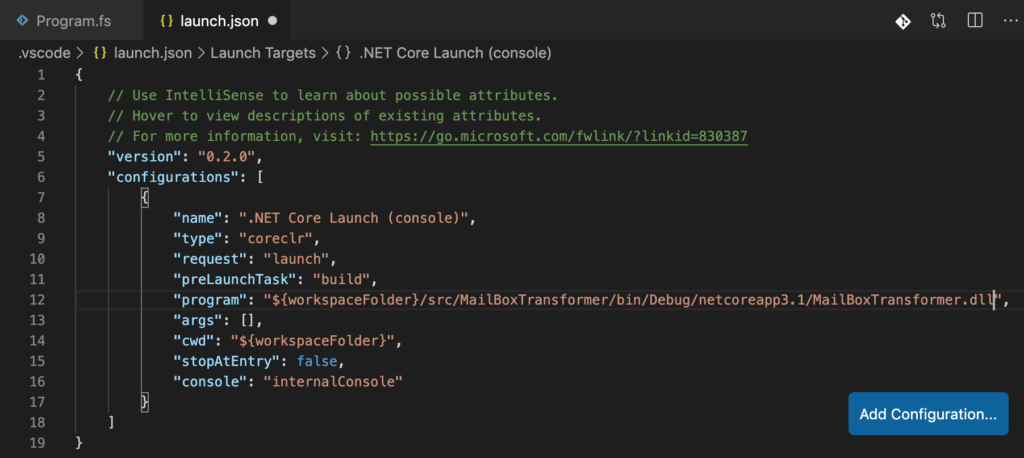
- Enter the path to the application
.dll
file in theprogram
attribute:"${workspaceFolder}/src/MailBoxTransformer/bin/Debug/netcoreapp3.1/MailBoxTransformer.dll"
- The path differs from the original template because the project is within the
src
sub-folder.
- Press
- Press
F5
again - VS Code now complains that it does not find the
build
task defined in thepreLaunchTask
attribute of thelaunch.json
file - Select
Configure Task
- Select
Create tasks.json file from template
- Choose the
.NET Core Executes .NET core build command
template
- VS Code generates the
tasks.json
file in the.vscode
folder and opens it.
- Edit the
tasks.json
file - If the
.fsproj
file is not in the main folder - Insert the path of the directory containing the
.fsproj
file as an additional argument fordotnet build
."${workspaceFolder}/src/MailBoxTransformer",
- To see the logs of the build task in the console (optional):
- Change the
presentation
attribute in thetasks.json
file
from"silent"
to"always"
- Change the
- Press
F5
again - VS Code runs
- The
dotnet build
process - The app
- The
- Add the
launch.json
and thetasks.json
files located in the.vscode
folder to your source control system (e.g. git).
You are now able to start the build process and the app itself from within VS Code. Now you can set break points and debug your app. I have included the complete launch.json
and the tasks.json
files below. Have fun!
launch.json
- Located in the
.vscode
folder
{
// Use IntelliSense to learn about possible attributes.
// Hover to view descriptions of existing attributes.
// For more information, visit: https://go.microsoft.com/fwlink/?linkid=830387
"version": "0.2.0",
"configurations": [
{
"name": ".NET Core Launch (console)",
"type": "coreclr",
"request": "launch",
"preLaunchTask": "build",
"program": "${workspaceFolder}/src/MailBoxTransformer/bin/Debug/netcoreapp3.1/MailBoxTransformer.dll",
"args": [],
"cwd": "${workspaceFolder}",
"stopAtEntry": false,
"console": "internalConsole"
}
]
}
tasks.json
- Located in the
.vscode
folder
{
// See https://go.microsoft.com/fwlink/?LinkId=733558
// for the documentation about the tasks.json format
"version": "2.0.0",
"tasks": [
{
"label": "build",
"command": "dotnet",
"type": "shell",
"args": [
"build",
"${workspaceFolder}/src/MailBoxTransformer",
// Ask dotnet build to generate full paths for file names.
"/property:GenerateFullPaths=true",
// Do not generate summary otherwise it leads to duplicate errors in Problems panel
"/consoleloggerparameters:NoSummary"
],
"group": "build",
"presentation": {
"reveal": "always"
},
"problemMatcher": "$msCompile"
}
]
}
References
Create an F# .NET Core app on macOS
Create a console app with the CLI
dotnet new console -lang "F#" -o src/MyConsoleApp
Run the app in the terminal
The easy way: Move first to the folder with the .fsproj
file and then use dotnet run
without any arguments:
cd src/MyConsoleApp
dotnet run
If you want to start the app from a location different than the one containing the .fsproj
file, you need to enter the argument --project
with the path to the .fsproj
file.
dotnet run --project src/MyConsoleApp/MyConsoleApp.fsproj
References
Coding F# on macOS
Lately, I wanted to code some F# scripts. I started up Visual Studio Code on my MacBook and created an fsx file. Then I noticed that intellisense was not working anymore despite active code highlighting. That was the start for a long journey. I ended up on installing (again):
- .NET Core 3.1 SDK
- Mono 6.6.0 (Visual Studio channel) (I am not shure anymore if I still need mono)
- Visual Studio Code (Here I only checked if there are updates available)
- Ionide-fsharp 4.6.3 extension for Visual Studio Code
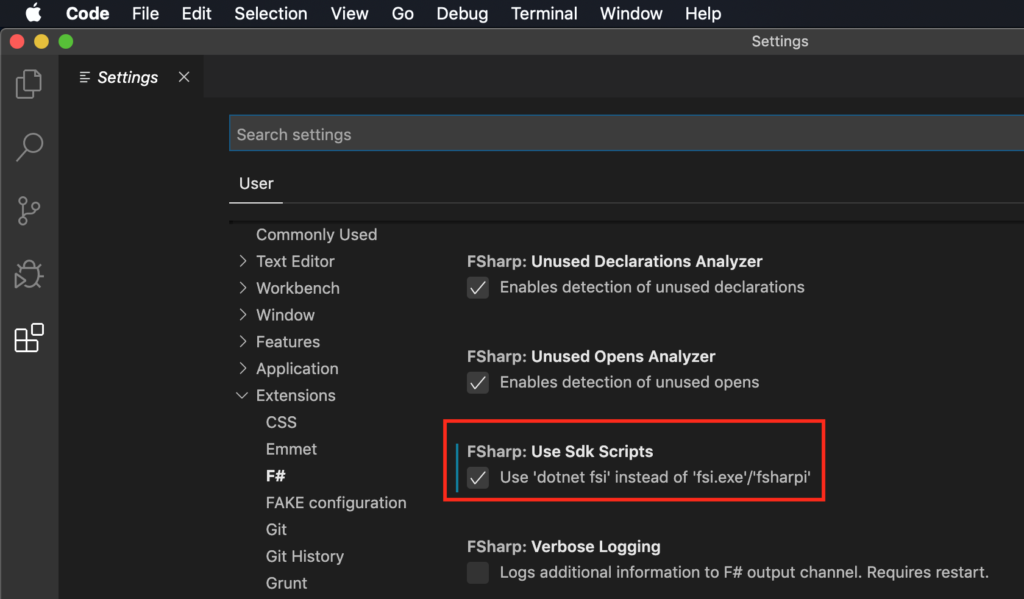
Intellisense was now working in F# projects and somehow/sometimes in fsx files within the context of an F# project. Then I tried it out in a stand-alone fsx file. Intellisense was not working again… Then I found some notes about the ‘FSharp.useSdkScripts’ option of the ionide-fsharp extension of Visual Studio Code. I activated the setting:
What a wonder, intellisense is working for F# fsx script files! With this setting enabled, I am no longer working with mono but with the .NET Core version of fsi (FSharp Interactive). With that, I think I don’t actually need mono.
References
Connect to a Raspberry Pi from macOS
TLDR
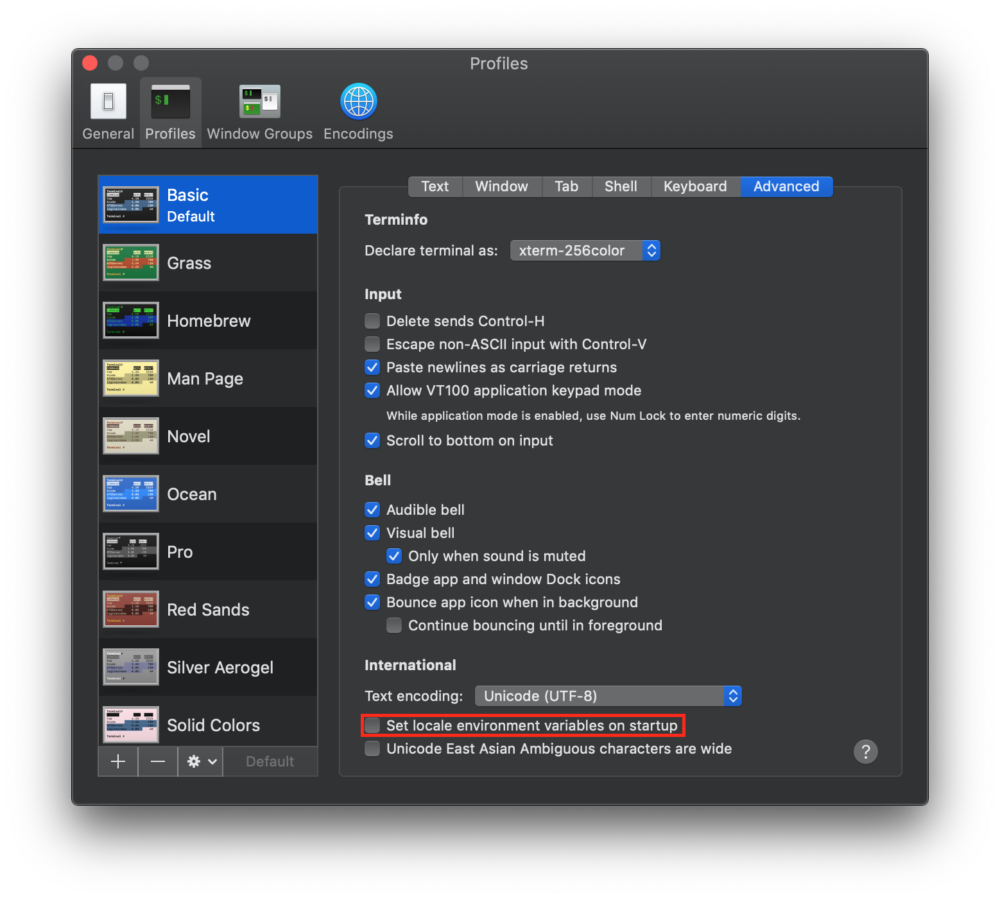
In the macOS Terminal preferences, uncheck ‘Set locale environment variables on startup’ in the ‘Advanced’ tab of the ‘Profiles’ section.
Issue
Weird things happen when connecting with the macOS Terminal to a Raspberry Pi. For example running the command ‘curl -fsSL get.docker.com -o get-docker.sh && sh get-docker.sh
‘ for installing Docker throws errors. The script struggles because Perl has a problem with the localization. So I started digging in the dirt. When running the command ‘locale
‘ to check the localization, I encountered an error message containing the phrase ‘Cannot set LC_CTYPE to default locale: No such file or directory
‘.
pi@raspberrypi:~ $ locale
locale: Cannot set LC_CTYPE to default locale: No such file or directory
locale: Cannot set LC_ALL to default locale: No such file or directory
LANG=en_GB.UTF-8
LANGUAGE=
LC_CTYPE=UTF-8
LC_NUMERIC="en_GB.UTF-8"
LC_TIME="en_GB.UTF-8"
LC_COLLATE="en_GB.UTF-8"
LC_MONETARY="en_GB.UTF-8"
LC_MESSAGES="en_GB.UTF-8"
LC_PAPER="en_GB.UTF-8"
LC_NAME="en_GB.UTF-8"
LC_ADDRESS="en_GB.UTF-8"
LC_TELEPHONE="en_GB.UTF-8"
LC_MEASUREMENT="en_GB.UTF-8"
LC_IDENTIFICATION="en_GB.UTF-8"
LC_ALL=
pi@raspberrypi:~ $
or
pi@raspberrypi:~ $ locale -a
locale: Cannot set LC_CTYPE to default locale: No such file or directory
C
C.UTF-8
de_CH.utf8
en_GB.utf8
POSIX
pi@raspberrypi:~ $
Solution
Trying to set localization with ‘sudo raspi-config
‘, ‘sudo dpkg-reconfigure locales
‘ or by editing ‘/etc/locale.gen
‘ and subsequently running ‘sudo locale-gen
‘ did not lead to success. Finally, I found that a difference in the locale settings on the client (macOS) and the host Raspberry Pi causes conflicts and the observed issues.
Host (macOS) locale
Naiad:~ rolf$ locale
LANG=
LC_COLLATE="C"
LC_CTYPE="UTF-8"
LC_MESSAGES="C"
LC_MONETARY="C"
LC_NUMERIC="C"
LC_TIME="C"
LC_ALL=
Client (Raspberry Pi) locale
pi@raspberrypi:~ $ locale
locale: Cannot set LC_CTYPE to default locale: No such file or directory
locale: Cannot set LC_ALL to default locale: No such file or directory
LANG=en_GB.UTF-8
LANGUAGE=
LC_CTYPE=UTF-8
LC_NUMERIC="en_GB.UTF-8"
LC_TIME="en_GB.UTF-8"
LC_COLLATE="en_GB.UTF-8"
LC_MONETARY="en_GB.UTF-8"
LC_MESSAGES="en_GB.UTF-8"
LC_PAPER="en_GB.UTF-8"
LC_NAME="en_GB.UTF-8"
LC_ADDRESS="en_GB.UTF-8"
LC_TELEPHONE="en_GB.UTF-8"
LC_MEASUREMENT="en_GB.UTF-8"
LC_IDENTIFICATION="en_GB.UTF-8"
LC_ALL=
Trick
The trick is now to not send the locale over SSH. This may be achieved by removing the ‘SendEnv LANG LC_*
‘ in the ‘/etc/ssh/ssh_config
‘ file.
An even easier way is to change the preferences of the macOS Terminal. To that end, uncheck ‘Set locale environment variables on startup’ in the ‘Advanced’ tab of the ‘Profiles’ section.
Client (Raspberry Pi) locale after change
pi@raspberrypi:~ $ locale
LANG=en_GB.UTF-8
LANGUAGE=
LC_CTYPE="en_GB.UTF-8"
LC_NUMERIC="en_GB.UTF-8"
LC_TIME="en_GB.UTF-8"
LC_COLLATE="en_GB.UTF-8"
LC_MONETARY="en_GB.UTF-8"
LC_MESSAGES="en_GB.UTF-8"
LC_PAPER="en_GB.UTF-8"
LC_NAME="en_GB.UTF-8"
LC_ADDRESS="en_GB.UTF-8"
LC_TELEPHONE="en_GB.UTF-8"
LC_MEASUREMENT="en_GB.UTF-8"
LC_IDENTIFICATION="en_GB.UTF-8"
LC_ALL=