Category Archives: Code

Run Pi-hole in a Docker container on a Raspberry Pi

I set up Pi-hole on a Raspberry Pi already a while ago and it is running fine. These are my notes that I took during installation. Unfortunately, the lack some details…

scp docker_run.sh pi@[IP]:docker_run.sh
  • Connect with SSH to the Raspberry Pi
  • run the script
sudo sh docker_run.sh

The script starts well but then encounters an issue after running the container:

Starting up pihole container docker_run.sh: 19: [: healthy: unexpected operator
.docker_run.sh: 19: [: healthy: unexpected operator

List all Docker containers

sudo docker container ls

Check the container

sudo docker inspect [Container ID]

Set the password for Pi-hole

Search the log file for the password

sudo docker logs pihole

References

Git: Remove ignored files

You can ignore files in git from being added to the repository by putting a .gitignore file into place. It might however happen that the .gitignore file seems not work. This is the case if you have already included the files in the git repository index.

To resolve the issue, you can perform these commands in your project directory containing the .git folder:

$ git rm -r --cached .
$ git add .
$ git commit -am "Remove ignored files"
  1. First, remove all the files from the git index. Don’t worry, this does not remove the actual local files.
  2. Then add back all files. The .gitignore file controls that git does not add the files to ignore.
  3. Finally, commit the changes.

References

Define the assembly information of an F# .NET Core app

There are several options to define the assembly information of an .NET Core app in F#:

  • .fsproj file
  • Directory.Build.props file
  • When running dotnet build or dotnet publish: -p:Version=a.b.c.d

The information of the .fsproj file seems to have priority over Directory.Build.props file. You can place the Directory.Build.props file in the project folder or the solution folder.

.fsproj file

<Project Sdk="Microsoft.NET.Sdk">

  <PropertyGroup>
    <OutputType>Exe</OutputType>
    <TargetFramework>netcoreapp3.1</TargetFramework>

    <Version>1.0.0.0</Version>
    <FileVersion>1.0.0.0</FileVersion>
    <Product>MyApp</Product>
    <Copyright>Copyright © 2020 by myself</Copyright>
  </PropertyGroup>

  <ItemGroup>
  ...

Directory.Build.props file

<Project>
  <PropertyGroup>
    <Version>1.0.0.0</Version>
    <FileVersion>1.0.0.0</FileVersion>
    <Product>MyApp</Product>
    <Copyright>Copyright © 2020 by myself</Copyright>
  </PropertyGroup>
</Project>

Check the assembly version

The simple way

  • Run: cat MyApp.dll
  • Check the last lines. They contain the assembly information

The convenient way

Install the versioninfo tool and run it on the .dll:

  • dotnet tool install --global dotnet-versioninfo
  • versioninfo MyApp.dll

References

Debug an F# .NET Core app in VS Code on macOS

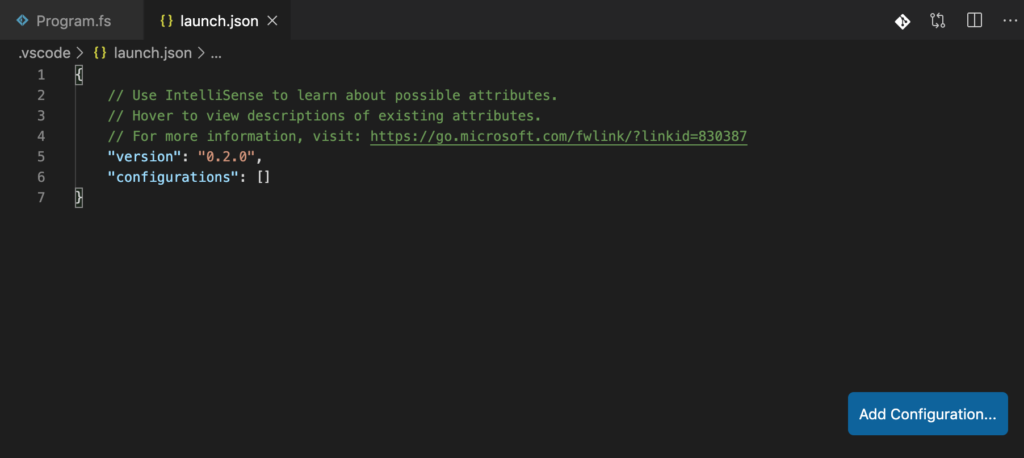
Press ‘F5’

The F5 button is the magic button to start debugging. However, if you start debugging the first time, you need to set up VisualStudio Code first. You need to setup a launch.json file to start debugging and a tasks.json file to first run the process.

Setup

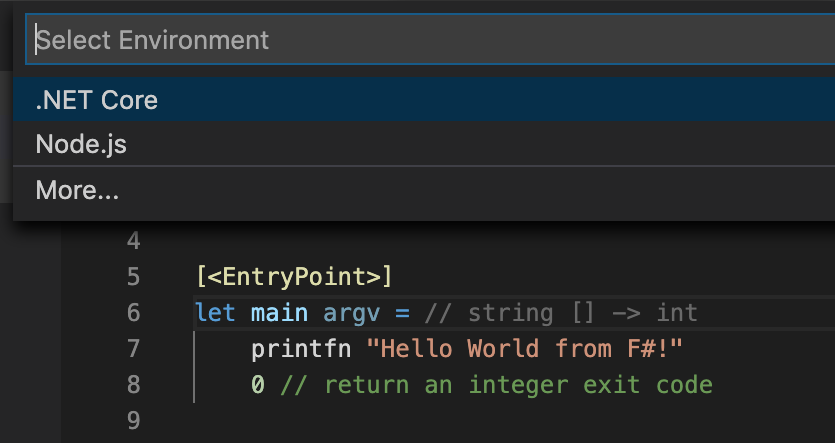
  • Press F5
  • Select .NET Core
Initial setup for debugging: Press 'F5' and select '.NET Core'
Initial setup for debugging: Press ‘F5’ and select ‘.NET Core’
  • VS Code generates the launch.json file in the .vscode folder and opens it.
VS Code generates 'launch.json' in the '.vscode' folder
VS Code generates ‘launch.json’ in the ‘.vscode’ folder
  • Edit the launch.json file
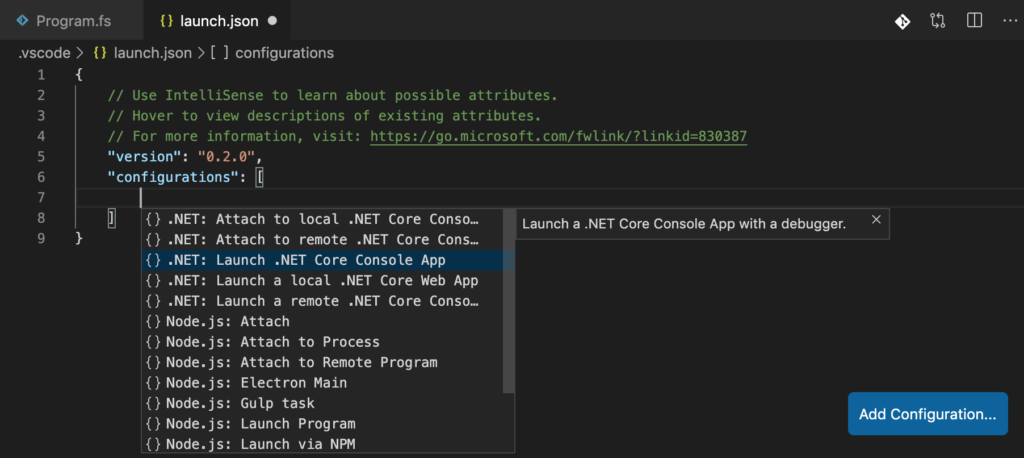
  • Insert the configuration entry within the selected square brackets of the ‘configuration’ section
    • Press Ctrl + Space Bar
    • Select .NET: Launch .NET Core Console App
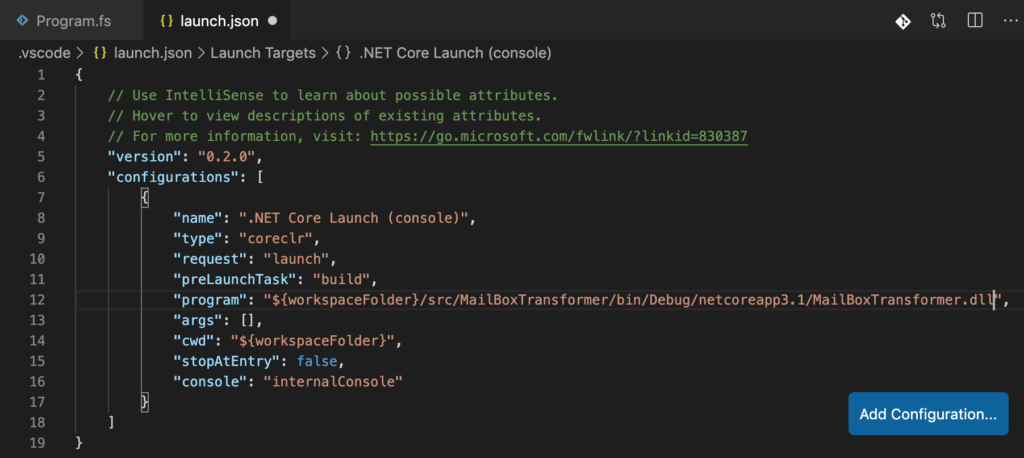
    • Enter the path to the application .dll file in the program attribute:
      "${workspaceFolder}/src/MailBoxTransformer/bin/Debug/netcoreapp3.1/MailBoxTransformer.dll"
    • The path differs from the original template because the project is within the src sub-folder.
Insert configuration entry by pressing 'Ctrl' + 'Space Bar' '.NET: Launch .NET Core Console App'
Insert configuration entry by pressing ‘Ctrl’ + ‘Space Bar’ ‘.NET: Launch .NET Core Console App’
Enter the path of the application '.dll' file in the 'program' attribute
Enter the path of the application ‘.dll’ file in the ‘program’ attribute
  • Press F5 again
  • VS Code now complains that it does not find the build task defined in the preLaunchTask attribute of the launch.json file
  • Select Configure Task
VS Code does not find the 'preLaunchTask' called 'build' and suggests to configure the task.
VS Code does not find the ‘preLaunchTask’ called ‘build’ and suggests to configure the task.
  • Select Create tasks.json file from template
Configure Task: Create 'tasks.json'
Configure Task: Create ‘tasks.json’
  • Choose the .NET Core Executes .NET core build command template
Select Task Template '.NET Core Executes .NET Core build command'
Select Task Template ‘.NET Core Executes .NET Core build command’
  • VS Code generates the tasks.json file in the .vscode folder and opens it.
  • Edit the tasks.json file
  • If the .fsproj file is not in the main folder
  • Insert the path of the directory containing the .fsproj file as an additional argument for dotnet build.
    • "${workspaceFolder}/src/MailBoxTransformer",
  • To see the logs of the build task in the console (optional):
    • Change the presentation attribute in the tasks.json file
      from "silent" to "always"
  • Press F5 again
  • VS Code runs
    • The dotnet build process
    • The app
  • Add the launch.json and the tasks.json files located in the .vscode folder to your source control system (e.g. git).
Console output of the app

You are now able to start the build process and the app itself from within VS Code. Now you can set break points and debug your app. I have included the complete launch.json and the tasks.json files below. Have fun!

launch.json

  • Located in the .vscode folder
{
    // Use IntelliSense to learn about possible attributes.
    // Hover to view descriptions of existing attributes.
    // For more information, visit: https://go.microsoft.com/fwlink/?linkid=830387
    "version": "0.2.0",
    "configurations": [
        {
            "name": ".NET Core Launch (console)",
            "type": "coreclr",
            "request": "launch",
            "preLaunchTask": "build",
            "program": "${workspaceFolder}/src/MailBoxTransformer/bin/Debug/netcoreapp3.1/MailBoxTransformer.dll",
            "args": [],
            "cwd": "${workspaceFolder}",
            "stopAtEntry": false,
            "console": "internalConsole"
        }
    ]
}

tasks.json

  • Located in the .vscode folder
{
    // See https://go.microsoft.com/fwlink/?LinkId=733558
    // for the documentation about the tasks.json format
    "version": "2.0.0",
    "tasks": [
        {
            "label": "build",
            "command": "dotnet",
            "type": "shell",
            "args": [
                "build",
                "${workspaceFolder}/src/MailBoxTransformer",
                // Ask dotnet build to generate full paths for file names.
                "/property:GenerateFullPaths=true",
                // Do not generate summary otherwise it leads to duplicate errors in Problems panel
                "/consoleloggerparameters:NoSummary"
            ],
            "group": "build",
            "presentation": {
                "reveal": "always"
            },
            "problemMatcher": "$msCompile"
        }
    ]
}

References

Create an F# .NET Core app on macOS

Create a console app with the CLI

dotnet new console -lang "F#" -o src/MyConsoleApp

Run the app in the terminal

The easy way: Move first to the folder with the .fsproj file and then use dotnet run without any arguments:

cd src/MyConsoleApp
dotnet run

If you want to start the app from a location different than the one containing the .fsproj file, you need to enter the argument --project with the path to the .fsproj file.

dotnet run --project src/MyConsoleApp/MyConsoleApp.fsproj 

References

Coding F# on macOS

Lately, I wanted to code some F# scripts. I started up Visual Studio Code on my MacBook and created an fsx file. Then I noticed that intellisense was not working anymore despite active code highlighting. That was the start for a long journey. I ended up on installing (again):

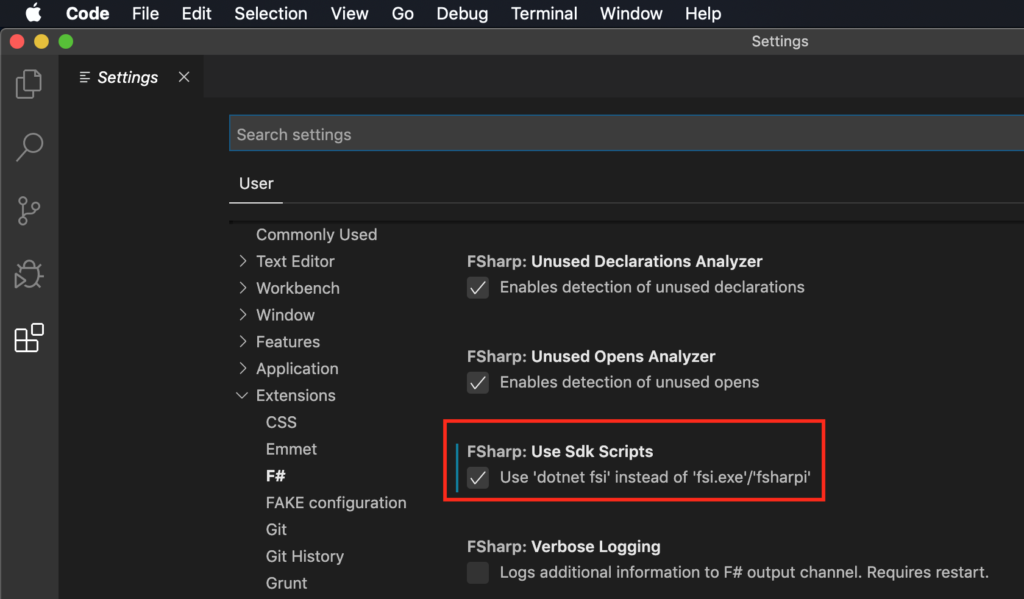
Intellisense was now working in F# projects and somehow/sometimes in fsx files within the context of an F# project. Then I tried it out in a stand-alone fsx file. Intellisense was not working again… Then I found some notes about the ‘FSharp.useSdkScripts’ option of the ionide-fsharp extension of Visual Studio Code. I activated the setting:

Visual Studio Code settings: Activate “Fsharp: Use Sdk Scripts: Use ‘dotnet fsi’ instead of ‘fsi.exe’/’fsharpi'”.

What a wonder, intellisense is working for F# fsx script files! With this setting enabled, I am no longer working with mono but with the .NET Core version of fsi (FSharp Interactive). With that, I think I don’t actually need mono.

References

Set up Docker on a Raspberry Pi

TLDR

curl -fsSL get.docker.com -o get-docker.sh && sh get-docker.sh

Important note

  • Use a power supply that has enough power. The Rasperry Pi might not work correctly when it has not enough power.

Installation

First download from get.docker.com the installation script using curl. Save the script in the file ‘get-docker.sh‘. Check the script and compare it with the original version on github. Then run the script with ‘sh‘.

curl -fsSL get.docker.com -o get-docker.sh
sh get-docker.sh

The above codes can be joined into a single line. The script is then run immediately after downloading, it cannot be checked. Unfortunately, the ‘&&‘ are not rendered correctly with the SyntaxHighlighter:

curl -fsSL get.docker.com -o get-docker.sh && sh get-docker.sh

Even shorter, without writing the script file ‘get-docker.sh‘ to the current directory. I would not recommend this version though.

curl -sSL https://get.docker.com/ | sh 

Problems

When installing Docker I somehow encountered problems and the connection to the Raspberry Pi froze. Looking at the Docker info I saw that the server was not running:

pi@raspberrypi:~ $ sudo docker info
Client:
 Debug Mode: false

Server:
ERROR: Cannot connect to the Docker daemon at unix:///var/run/docker.sock. Is the docker daemon running?
errors pretty printing info

After some research I tried to reinstall the docker-engine:

sudo apt-get install -y -q docker-engine

… but received again an error:

E: dpkg was interrupted, you must manually run 'sudo dpkg --configure -a' to correct the problem. 

… so I typed in the suggested command:

sudo dpkg --configure -a

As far as I remember, this command used to freeze previously. After some research I decided to use a more powerfull power supply for the Raspberry Pi. This time, it was installing correctly:

pi@raspberrypi:~ $ sudo dpkg --configure -a
Setting up containerd.io (1.2.10-3) ...
Created symlink /etc/systemd/system/multi-user.target.wants/containerd.service → /lib/systemd/system/containerd.service.
Setting up docker-ce-cli (5:19.03.5~3-0~raspbian-buster) ...
Setting up docker-ce (5:19.03.5~3-0~raspbian-buster) ...
Created symlink /etc/systemd/system/multi-user.target.wants/docker.service → /lib/systemd/system/docker.service.
Created symlink /etc/systemd/system/sockets.target.wants/docker.socket → /lib/systemd/system/docker.socket.
Processing triggers for man-db (2.8.5-2) ...
Processing triggers for systemd (241-7~deb10u1+rpi1) ...

Check the installation

I checked the installation with docker info. It seems to be alright now:

pi@raspberrypi:~ $ sudo docker info
Client:
 Debug Mode: false

Server:
 Containers: 0
  Running: 0
  Paused: 0
  Stopped: 0
 Images: 0
 Server Version: 19.03.5
 Storage Driver: overlay2
  Backing Filesystem: extfs
  Supports d_type: true
  Native Overlay Diff: true
 Logging Driver: json-file
 Cgroup Driver: cgroupfs
 Plugins:
  Volume: local
  Network: bridge host ipvlan macvlan null overlay
  Log: awslogs fluentd gcplogs gelf journald json-file local logentries splunk syslog
 Swarm: inactive
 Runtimes: runc
 Default Runtime: runc
 Init Binary: docker-init
 containerd version: b34a5c8af56e510852c35414db4c1f4fa6172339
 runc version: 3e425f80a8c931f88e6d94a8c831b9d5aa481657
 init version: fec3683
 Security Options:
  seccomp
   Profile: default
 Kernel Version: 4.19.75-v7+
 Operating System: Raspbian GNU/Linux 10 (buster)
 OSType: linux
 Architecture: armv7l
 CPUs: 4
 Total Memory: 926.1MiB
 Name: raspberrypi
 ID: VMGN:PNRJ:3O7Q:PXSZ:HKHG:EF7R:6LAD:FAIJ:SJMS:GRMU:EF5P:6HNL
 Docker Root Dir: /var/lib/docker
 Debug Mode: false
 Registry: https://index.docker.io/v1/
 Labels:
 Experimental: false
 Insecure Registries:
  127.0.0.0/8
 Live Restore Enabled: false

WARNING: No swap limit support
WARNING: No cpu cfs quota support
WARNING: No cpu cfs period support

Hello world

Now it’s time to run the hello world:

pi@raspberrypi:~ $ sudo docker run hello-world
Unable to find image 'hello-world:latest' locally
latest: Pulling from library/hello-world
4ee5c797bcd7: Pull complete 
Digest: sha256:d1668a9a1f5b42ed3f46b70b9cb7c88fd8bdc8a2d73509bb0041cf436018fbf5
Status: Downloaded newer image for hello-world:latest

Hello from Docker!
This message shows that your installation appears to be working correctly.

To generate this message, Docker took the following steps:
 1. The Docker client contacted the Docker daemon.
 2. The Docker daemon pulled the "hello-world" image from the Docker Hub.
    (arm32v7)
 3. The Docker daemon created a new container from that image which runs the
    executable that produces the output you are currently reading.
 4. The Docker daemon streamed that output to the Docker client, which sent it
    to your terminal.

To try something more ambitious, you can run an Ubuntu container with:
 $ docker run -it ubuntu bash

Share images, automate workflows, and more with a free Docker ID:
 https://hub.docker.com/

For more examples and ideas, visit:
 https://docs.docker.com/get-started/

References

Appendix: Curl options

See: https://manpages.debian.org/buster/curl/curl.1.en.html

-f, –fail

(HTTP) Fail silently (no output at all) on server errors. This is mostly done to better enable scripts etc to better deal with failed attempts. In normal cases when an HTTP server fails to deliver a document, it returns an HTML document stating so (which often also describes why and more). This flag will prevent curl from outputting that and return error 22.

This method is not fail-safe and there are occasions where non-successful response codes will slip through, especially when authentication is involved (response codes 401 and 407).

-s, –silent

Silent or quiet mode. Don’t show progress meter or error messages. Makes Curl mute. It will still output the data you ask for, potentially even to the terminal/stdout unless you redirect it.

See also -v, –verbose and –stderr.

-S, –show-error

When used with -s, –silent, it makes curl show an error message if it fails.

-L, –location

(HTTP) If the server reports that the requested page has moved to a different location (indicated with a Location: header and a 3XX response code), this option will make curl redo the request on the new place. If used together with -i, –include or -I, –head, headers from all requested pages will be shown. When authentication is used, curl only sends its credentials to the initial host. If a redirect takes curl to a different host, it won’t be able to intercept the user+password. See also –location-trusted on how to change this. You can limit the amount of redirects to follow by using the –max-redirs option.

When curl follows a redirect and the request is not a plain GET (for example POST or PUT), it will do the following request with a GET if the HTTP response was 301, 302, or 303. If the response code was any other 3xx code, curl will re-send the following request using the same unmodified method.

You can tell curl to not change the non-GET request method to GET after a 30x response by using the dedicated options for that: –post301, –post302 and –post303.

-o, –output <file>

Write output to <file> instead of stdout. If you are using {} or [] to fetch multiple documents, you can use ‘#’ followed by a number in the <file> specifier. That variable will be replaced with the current string for the URL being fetched. Like in:

curl http://{one,two}.example.com -o “file_#1.txt”

or use several variables like:

curl http://{site,host}.host[1-5].com -o “#1_#2”

You may use this option as many times as the number of URLs you have. For example, if you specify two URLs on the same command line, you can use it like this:

curl -o aa example.com -o bb example.net

and the order of the -o options and the URLs doesn’t matter, just that the first -o is for the first URL and so on, so the above command line can also be written as

curl example.com example.net -o aa -o bb

See also the –create-dirs option to create the local directories dynamically. Specifying the output as ‘-‘ (a single dash) will force the output to be done to stdout.

See also -O, –remote-name and –remote-name-all and -J, –remote-header-name.
Connect to a Raspberry Pi from macOS

TLDR

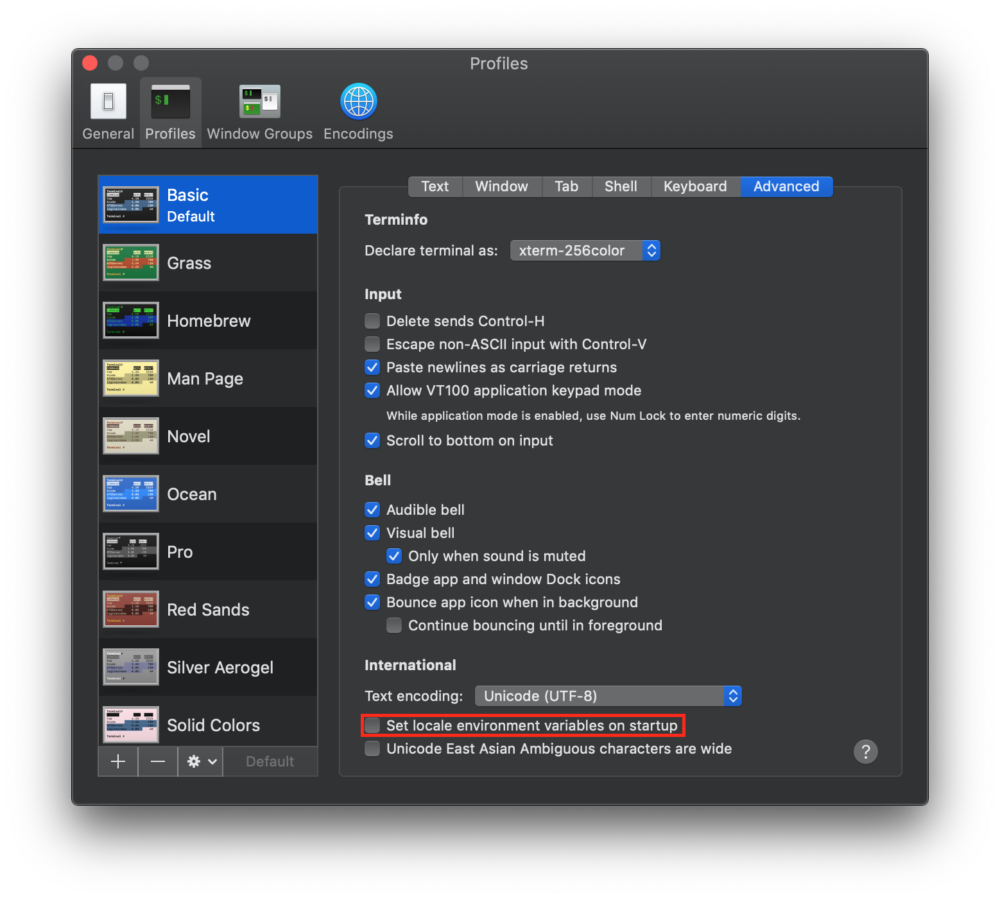
In the macOS Terminal preferences, uncheck ‘Set locale environment variables on startup’ in the ‘Advanced’ tab of the ‘Profiles’ section.

Issue

Weird things happen when connecting with the macOS Terminal to a Raspberry Pi. For example running the command ‘curl -fsSL get.docker.com -o get-docker.sh && sh get-docker.sh‘ for installing Docker throws errors. The script struggles because Perl has a problem with the localization. So I started digging in the dirt. When running the command ‘locale‘ to check the localization, I encountered an error message containing the phrase ‘Cannot set LC_CTYPE to default locale: No such file or directory‘.

pi@raspberrypi:~ $ locale
locale: Cannot set LC_CTYPE to default locale: No such file or directory
locale: Cannot set LC_ALL to default locale: No such file or directory
LANG=en_GB.UTF-8
LANGUAGE=
LC_CTYPE=UTF-8
LC_NUMERIC="en_GB.UTF-8"
LC_TIME="en_GB.UTF-8"
LC_COLLATE="en_GB.UTF-8"
LC_MONETARY="en_GB.UTF-8"
LC_MESSAGES="en_GB.UTF-8"
LC_PAPER="en_GB.UTF-8"
LC_NAME="en_GB.UTF-8"
LC_ADDRESS="en_GB.UTF-8"
LC_TELEPHONE="en_GB.UTF-8"
LC_MEASUREMENT="en_GB.UTF-8"
LC_IDENTIFICATION="en_GB.UTF-8"
LC_ALL=
pi@raspberrypi:~ $ 

or

pi@raspberrypi:~ $ locale -a
locale: Cannot set LC_CTYPE to default locale: No such file or directory
C
C.UTF-8
de_CH.utf8
en_GB.utf8
POSIX
pi@raspberrypi:~ $ 

Solution

Trying to set localization with ‘sudo raspi-config‘, ‘sudo dpkg-reconfigure locales‘ or by editing ‘/etc/locale.gen‘ and subsequently running ‘sudo locale-gen‘ did not lead to success. Finally, I found that a difference in the locale settings on the client (macOS) and the host Raspberry Pi causes conflicts and the observed issues.

Host (macOS) locale

Naiad:~ rolf$ locale
LANG=
LC_COLLATE="C"
LC_CTYPE="UTF-8"
LC_MESSAGES="C"
LC_MONETARY="C"
LC_NUMERIC="C"
LC_TIME="C"
LC_ALL=

Client (Raspberry Pi) locale

pi@raspberrypi:~ $ locale
locale: Cannot set LC_CTYPE to default locale: No such file or directory
locale: Cannot set LC_ALL to default locale: No such file or directory
LANG=en_GB.UTF-8
LANGUAGE=
LC_CTYPE=UTF-8
LC_NUMERIC="en_GB.UTF-8"
LC_TIME="en_GB.UTF-8"
LC_COLLATE="en_GB.UTF-8"
LC_MONETARY="en_GB.UTF-8"
LC_MESSAGES="en_GB.UTF-8"
LC_PAPER="en_GB.UTF-8"
LC_NAME="en_GB.UTF-8"
LC_ADDRESS="en_GB.UTF-8"
LC_TELEPHONE="en_GB.UTF-8"
LC_MEASUREMENT="en_GB.UTF-8"
LC_IDENTIFICATION="en_GB.UTF-8"
LC_ALL=

Trick

The trick is now to not send the locale over SSH. This may be achieved by removing the ‘SendEnv LANG LC_*‘ in the ‘/etc/ssh/ssh_config‘ file.

An even easier way is to change the preferences of the macOS Terminal. To that end, uncheck ‘Set locale environment variables on startup’ in the ‘Advanced’ tab of the ‘Profiles’ section.

macOS Terminal settings: Uncheck ‘Set locale environment variables on startup’

Client (Raspberry Pi) locale after change

pi@raspberrypi:~ $ locale
LANG=en_GB.UTF-8
LANGUAGE=
LC_CTYPE="en_GB.UTF-8"
LC_NUMERIC="en_GB.UTF-8"
LC_TIME="en_GB.UTF-8"
LC_COLLATE="en_GB.UTF-8"
LC_MONETARY="en_GB.UTF-8"
LC_MESSAGES="en_GB.UTF-8"
LC_PAPER="en_GB.UTF-8"
LC_NAME="en_GB.UTF-8"
LC_ADDRESS="en_GB.UTF-8"
LC_TELEPHONE="en_GB.UTF-8"
LC_MEASUREMENT="en_GB.UTF-8"
LC_IDENTIFICATION="en_GB.UTF-8"
LC_ALL=

References

Set up a Rasperry Pi from scratch without a monitor and keyboard

Note

  • Setting up the Raspberry Pi without a monitor and without keyboard is called a ‘headless’ setup.
  • Using the NOOBS installer seems not to work. Instead flash the card directly with an image.
  • Activate the SSH service by placing a file called ‘ssh’ into the boot partition.
  • The initial start up of the Raspberry Pi may take 20 min.

Procedure

Dowload Raspian Image

Flash the image to the microSDHC card

Activate the SSH service

  • Mount the microSDHC card on the computer used to flash the image to the card
  • Add an additional, empty file called ‘SSH‘ to the boot partition
    • ‘cd’ into the boot partition
      cd /Volumes/boot/
    • Create an empty file named ‘ssh’:
      touch ssh

Set up the Raspberry Pi

  • Insert the microSDHC card into the Raspberry Pi
  • Connect the Rasperry Pi to the network
  • Boot up the Raspberry Pi by connecting it to the power supply
  • Be patient – it may take 20 min for the Raspberry Pi for the initial start up. Wait until the red power led glows steadily and the green activity led stopped flashing.

Find out the IP address of the Raspberry Pi

  • Login to the router. Check the assigned IPs.
  • Scan the IP range
    • On Mac in the Terminal (The && in the code below are not rendered correctly)
for ip in $(seq 1 254);
do ping -c 1 -t2 192.168.10.$ip;
[ $? -eq 0 ] &amp;&amp; echo "192.168.10.$ip UP" || : ; done

Connect with SSH to the Raspberry Pi

  • Find out the IP address of the Raspberry Pi
  • In the Terminal enter
    ssh pi@[IP address]
  • Confirm the message by typing ‘yes’
  • Enter the password ‘raspberry’

Configure with raspi-config

  • After connecting with SSH to the Raspberry Pi, enter:
    sudo raspi-config
  • Advanced Options → Expand Filesystem
    • Check the file system with
      df -h
  • Change User Password

References